

Hello there, my fellow crafters. By special request today I am presenting a tutorial on using your Cameo, Chomas Adjustable Pen Holder and Lettering Delights Thin Line Fonts to create custom sentiments to go inside your handmade greeting cards. This is a picture heavy tutorial, meant to instruct the newbie. If you are more experienced, you may want to skip through and find the parts that interest you.
Here we go:
First, replace your Cameo blade with your Chomas Adjust pen holder (for Cameo) following the directions enclosed with your pen holder.


Add your pen, also following directions that came with your pen holder. I'm using a Gelly Roll gel pen.

Now, we are going to create our sentiment to go inside our card. First, we are going to create a rectangular box to place our words in. In your Silhouette Studio software, click on the Create A Rectangle icon located on the left of your screen.

Create your box on the mat by moving your cursor to a spot on the mat and left click and hold the button down as you drag your mouse down and to the right. Release left mouse button, when you have a rectangle about the size you like. Now you should size your rectangle to fit comfortably inside your card. I do this by dragging the lower right corner of my rectangle until it's the size I want. Remember to create your box to fit the orientation of your card. In this example, my card is an A2 size (4.25" X 5.5 ") and it the width is larger than the height. I decided on a 3.75" X 5 " block (approximately) for this card which leaves a half inch border when adhered to the inside of the card.

Now, the next few steps do not need to be in this exact order, but this is the order in which I created this particular block. Go to your Fonts by clicking on the Text Styles icon (see arrow in picture) in the upper right hand side of your top tool bar. A listing of all the fonts installed on your computer will appear in your Text Style menu. Choose a font by clicking on it in your menu. If you want your results to turn out the way mine did in this tutorial, you need to use a Thin Line Font, like the ones I purchased from Lettering Delights. I will add a link to their site at the end of this tutorial. These fonts will be listed as "LDT.........." with the name of the font after the LDT. This prefix makes it super easy to find them in your font list. I am using LDT Hearth in this example.

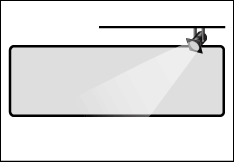
Next, go the Text Icon on the left side tool bar and click on it. See picture below:

Now, bring your cursor inside the rectangle, where you want your letters to start, and click. A blinking cursor should now sit inside your rectangle.

Before you start typing, you might want to change your text size. It defaults to 72pt which is rather large. I like to use 24 pt as a general rule, but it really depends on how much text you are entering. In this example I had 4 lines of text for a small card, so I used 18 pt. You can always adjust your sizing later, but 24pt is typically a good starting point.

There are lots of sites with card phrases, verses, quotes, etc to use. All I do is Google what I'm looking for. In this example I Googled "Get Well Soon quotes" and a nice selection of sites came up.

Once I found one I liked, I went back to my Silhouette mat and typed it in. I pressed enter when I wanted to move to the next line. The words will not wrap. The important thing is to get your words into the text box . The text box is the box you see with the dark black line on the right of the box. When that black line is showing, you are in "creating the text box" phase. I refer to this as having your text box "active". Another way to activate your text box is to double click on it. It will highlight the text. When you do this, you are able to modify the text size, font type, make it bold, etc.

Now that I have my text, I realize it is not exactly placed here I want it. Once you click away from the text box, adding or editing text is no longer available, (sort of). It is now considered an image, and you can manipulate it as a whole, as you would any other image. If you click on it, the modify box we are familiar with appears. See the box below. You can now move your image, elongate it, make it taller, whatever your heart desires.

I decided this needed to be centered inside my card sentiment box (the larger rectangle) so I moved it using my mouse, as you would any other image, until I liked it's placement.

Once I moved my text to the center of my sentiment box, I realized it looked rather puny. So, I decided to add some spacing between the lines. In order to do this, I needed to activate my font box again. To do this double click on the text box and the black solid line should appear. Place your cursor at the end of each line of text and hit your enter key to add a line space.

I like that spacing so much better. However, it's sitting a little low in the sentiment box. I have two choices. I can either activate the text image and move it, or activate the rectangle image and move it until the text is centered inside. The choice is yours.

Once you are happy with your text placement, activate your rectangle outside your text box. I made my line easier to see by choosing the line style box (I don't have a picture but it's the icon on the upper right tool bar and it has one solid and several dotted line styles) and clicking on the thick black line. You do not need to do this. I did it so you could see it easier for this tutorial.

Move the rectangle off your mat.

You will be left with just the text on your mat.

Load your mat with cardstock into your Cameo.

Click "Send to Silhouette" icon.

This will open up your Silhouette Cut settings. Choose Silhouette Sketch Pen.

When using a gel pen I always click the double cut box. It will trace the letters/image twice and it's just extra insurance in case the pen skips or the ink flow lightens a bit during the process. It insures a nice vivid image.

Now click on the cut button....

and the magic begins........!!!

Oooh....Aaaah.....pretty.....awesome! DO NOT UNLOAD YOUR MAT!!!!!

Now, go grab that rectangle sitting over on the side, off your mat. Drag it over the wording on your screen and move it to where you like it.

Highlight your text box and move it off your mat. We are preparing to cut out our sentiment box.

Replace your Chomas pen holder with your blade/housing and tighten. Be sure to move your blade to the proper depth before you load it.

Click on Change Settings

Change your settings from Silhouette Sketch pen to the proper cardstock setting for the cardstock you are using. Once you have adjusted your settings, press Cut.

Here is your sentiment box.....

Oh, I love this technique! How much money I will save on word stamps. I also like the way it looks better than using my printer.

I decided this empty card I had would be good to use as a Get Well card.

There you have it!
This method can also be used for journaling blocks on scrapbook pages.
I mentioned earlier that I use Thin Fonts from Lettering Delights to achieve these results. The Hearth font is from the Thin Font Script Set 1. Most other fonts are not thin enough to give you what appears to be a single line, instead they show up as an open silhouette style lettering. Here is the link to the Lettering Delights Thin Fonts. You will also need an adjustable pen holder. I love my Chomas Adjustable Pen holder, especially with good old gel pens. The results are fabulous. Here is the link to Chomas Creations where you can order not only adjustable pen holders, but some other neat tools for your die cutting machines. Amy is awesome and I love sending new customers her way!
Because I love my pen holder so much, I am giving one away to one lucky follower. If you would like a chance to win a pen holder please become a follower and leave me a message on this blogpost. You also need to leave me a way to contact you in case you are the lucky winner! I will choose the winner via random drawing on Sunday, July 22nd. Good luck!


Thanks for a great tutorial! I really need to try this out.
ReplyDeleteI will have to try it when I get home.
ReplyDeleteGreat tutorial Carole - thanks.
ReplyDeleteGreat Tutorial Carole!!! I have seen you do this in person, it really is super easy. Thanks for the chance to win!
ReplyDeleteThis tutorial is exactly what I need to help me with a project that I am working on! Your instructions are so helpful. Love the pictures too! Thanks for the chance to win! Sonya
ReplyDeleteI just subscribed to the blog, I can't wait to use the sketch feature. I'm actually making a bunch of cards today. Thanks for all the great info. smarolda@hotmail.com
ReplyDeleteOhhhhh Ahhhhhhhh....... Thank you for the tips and tutorial. One of these days I will try it;)
ReplyDeleteThank you for sharing this tutorial, Love the tip writing thin letters.
ReplyDeleteThank you for sharing this tutorial, Love the tip for writting the thin letters.
ReplyDeleteGreat tutorial, I would love to try this. This would be so much easier than printing and manually cutting around the text. Also, for spacing the text, at least in DE, you can change the line spacing and character spacing with the sliders at the bottom of the Text Style dialog box, which gives you a bit more control. Thanks for the chance to win!
ReplyDeleteThanks for the great tutorial! I have been hesitant to try the pens because I had some questions about it, but you cleared it up. I am going to try it today! Great blog and you have a new follower in me! Come by my blog for birthday celebration blog hop on July 18 & 19! http://www.customcreativeexpressions.blogspot.com
ReplyDeleteGreat tutorial Carole! I still have to play with mine! Hmmm... Of to lettering delights for some fonts! (don't include me in the drawing :-))
ReplyDeleteCarole
ReplyDeleteThis was a wonderful tutorial for the Cameo. I am hoping I can utilize the tutorial and make it work with SCAL and my Expressions.
What a godsend that would be. I could do all those wonderful sentiments with my own matting around them. (like thought bubbles or clouds or any other shape)
I can hardly wait for a little time to play.
Myrna
p.s. Yes I am a follower and very happy to follow you.
Just became a follower. Thanks for the freat tutorial!
ReplyDeleteOops...meant GREAT tutorial!
ReplyDeleteThank you for a great tutorial. I thought The Thin Fonts could only be used with Make the Cut! I am sorry to say I recently bought Make the Cut and now it appears I didn't need it and wasted my money. I bought one set of Thin Fonts also so I will try using just the Cameo to print it. Thanks again. Donna
ReplyDeleteThank you so much for this great tutorial. I am very new to the Cameo, and the very detailed instructions are sooo appreciated!! I would be so thrilled to win one of Amy's pen holder, as I would really like to create my own sentiments like you showed us. I am now a follower of your blog... I hope you will be sharing some more tutorials and more of your beautiful creations. :)
ReplyDeleteThanks again.
Lori
got2bcrafting at gmail dot com
just saw your tutorial! very cool!! thanks for the tip on the double cut with the gels!
ReplyDeleteNow I need to figure out how to do that on my Cricut and SCAL. Thanks for showing me how to find sentiments.
ReplyDeleteWow, thx so much for the tutorial! I really need one those! Thx for the chance to win!
ReplyDeleteDana
Taz61954@gmail.com
Thanks for the tut! My Sil is winging its way to me as I type! Can't wait to get started :-)
ReplyDeletePS - this wouldn't allow me to put my URL in, so if I'm lucky enough to win, I'll send you my email address :-)
Thanks for the chance to win!
ReplyDeletekdc79@comcast.net
This comment has been removed by the author.
ReplyDeleteCarole, Thank you for posting step by step as to how to do this. For someone who already knows how to do this it's easy to forget that there are so many newbies out there that don't know each step and I as a newbie really appreciate it. Also, thank you for your kindness in winning a Chomas Pen holder. I don't have one and think it would be awesome to win.
ReplyDeleteThank you!
Caroline (aka Doxieluv01)
Wow - just found this blog. Awesome!! Hope I'm not too late to enter, as I just got my Cameo last week, and ordered my Chomas pen holder TODAY!
ReplyDeleteThe pen holder looks fab! x I would love one x Thanks for tutorial x Leigh x
ReplyDeleteI will have to try it when i get time..thanks for sharing with us.Order Business Cards
ReplyDeleteCaptivating design with briefly described, do you have any design related to plastic cards to share...
ReplyDeleteCeiling fans with lights offers users the option to light up the room and gives
ReplyDeletea decorative look to it. with your fan, you will want to
double check and ensure that the ball. Manipulating the
effects of lighting has since been known as one way of redecorating
one's office and house.
Also visit my website ... harbor breeze ceiling fans with lights and remote
Ӏt's very effortless to find out any matter on net as compared to textbooks, as I found this post at this site.
ReplyDeleteFeel free to visit my blog; DiamondLinks.net Review