Pam - http://www.thebugbytes.com/
Jeannie - http://nonnasscraps.blogspot.com/
Jen - http://3catsandabug.blogspot.com/
Carole - http://www.onmycraftroomwall.blogspot.com/ YOU ARE HERE
Lisa Brooks - http://thejourneyoflisaslife.blogspot.com
Audrey - http://cuteandsome.blogspot.com/
Mila - http://milamemories.blogspot.com/
Sheila aka sassylady - http://shesasassylady.blogspot.com/
Elizabeth - http://217creations.blogspot.com/
Kelly Millet - http://www.kamscraftyplace.blogspot.com
Dayna Sabrina - http://www.sabrioletdesigns.blogspot.com/
Lori - http://www.scrappinmystressaway.blogspot.com
Denine Vajja - http://pumpkinspiceblog.blogspot.com/
Melissa - www.melissamade2.blogspot.com
Allison - http://goodybagdiva.blogspot.com/
Now on to my very simple project.
I am in love with making these paper wreaths!
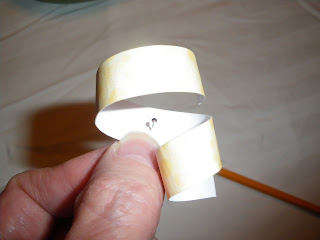
Now, I must confess, this is the only picture of my project I did not delete. Well, I did delete it but luckily I still have the one I sent to Pam (thank goodness you asked for one, Pam!) I took at least 8 pictures last week of this process and when I just went to upload them to this post, I noticed that I did not save them to my computer and deleted them from my camera. Considering I rarely delete photos from my camera, the irony is not lost on me. Oh well, this is such an easy project I should be able to adequately describe the process.
Supplies:
8" styrofoam wreath (I used the green hard styrofoam)
straight pins
12 X 12 double sided paper or cardstock (about 3 or 4 sheets)
ribbon-18" length
mini ornament balls
pen, pencil or something similar
Cut paper into 1/2" strips. Then cut each strip in half. You will have a pile of 6" X 1/2" paper strips. Take a paper strip and wrap it completely around a pen or pencil. After wrapping the entire strip around the pencil, let it drop from the pencil. The paper should be curly. Do this with at least half of your cut paper strips. Once you have a nice pile of curls, you are ready to start pinning them to your foam wreath. First, tie your piece of ribbon at the top of the wreath to create a hanger. Next, push a stick pin through the center of a paper curl and pin it to the styrofoam wreath. I always start at the top of the wreath, by the ribbon hanger and then work my way around the wreath, clockwise. I do not cover the back of the wreath as it will be against a wall or flat surface once I hang it. Curl more paper strips as needed. Once you go completely around the wreath, give it a good once over and fill in any spots you feel you need to. You can make the wreath as full of paper curls as you want. The look is entirely yours.
OK, I've decided I must have pictures to share....luckily I can recreate a few to help explain the process.....
Tie ribbon at top of wreath
Curl paper around pencil
Curled paper
Place pin through paper
Start by placing paper curls at top of wreath and keep adding working around wreath in clockwise direction
Once you are done with attaching the paper curls, you can add the decorative ornaments. I used a 12 cluster pack of ornaments I got on sale at Michael's for less than $2.00. I separated the ornaments, which were each attached to a long wire. I cut the wire in half (it was too long) and stuck the wire into the styrofoam wreath in various spots around the circle. At times it was difficult to poke the wire through the hard styrofoam, for these times I first poked a hole with a straight pin and then stuck the bulb wire into the styrofoam. Once again, here is the finished project:
This is a simple and quick project to complete. If shouldn't take more than a few hours from start to finish, and that's if you are chatting with friends and snacking during the process. Little skill is required and it is a nice project to do with friends who may be new to the crafting world.
Now, for my giveaway. If you are a follower of my blog and you leave a comment here, you will be entered in a random drawing to receive a $10 Starbucks gift card. Who can't use a little extra caffeine during the holiday season? The drawing will be held at 9:00 PM on Tuesday, December 13th.
Next up on the blog hop is a really good friend and someone I am lucky enough to get to craft with frequently, Lisa Brooks. Please hop on over to her blog Rather B Scrappin and see what she has to share with all of you.
Happy Holidays!
Carole


Great instructions. Looks easy to make and such a lovely lovely result. TFS
ReplyDeleteSimple? This is freakin' GORGEOUS! I love it. We are going to have to make one in February, maybe a Valentine's Day version. This is a really, really great job Carole. Thanks for sharing!
ReplyDeleteGreat Job Carole! I love those wreath too!
ReplyDeleteThis is NOT a simply wreath ~ it is simply beautiful!! I LOVE it!! This could be something I let my 6 year old help to create a special decoration, or something I do myself as a gift to give!! Love the possibilities!!
ReplyDeleteSo glad to be in this hop with you!
Oh my goodness! I adore this wreath!! It is so beautiful!
ReplyDeleteTracy
jtg0398 at sbcglobal dot net
This is SUCH a cool idea! I am so putting it on my list to try!
ReplyDeleteLove it Carole, although it might be easy to do, it does not look like it was an easy project, very lovely looking.
ReplyDeleteI love your wreath - so very pretty!
ReplyDeleteClever! I love the color combo
ReplyDeleteThis is just beautiful! Love the look. TFS
ReplyDeleteVery pretty! I love easy projects that look like you spent a lot of time on
ReplyDeleteOh I love this idea... Pumpkin would have a blast wrapping all the papers around the pencil. :)
ReplyDeleteYour color combination is very elegant. TFS.
I LOVE your wreath! Thanks for the tutorial!
ReplyDeleteWow, that turned out fabulous!!!
ReplyDeleteStunning wreath. Looks like a great project while watching tv.
ReplyDeleteWhat a cute wreath! Looks so easy to make, too!
ReplyDeleteWOW!!! Your wreath is beautiful!
ReplyDeleteplese.cathy at yahoo dot com
happyscrapin@blogspot.com
WOW...this is so fun ! thanks for the great instructions on how you did this.
ReplyDeleteThis is such a cute wreath. Thanks for such a creative and fun idea.
ReplyDeletemarg0006@verizon.net
What an awesome wreath!!
ReplyDeleteThis is a really cute paper crafting idea.
ReplyDeleteRebecca
brrck@yahoo.com
Love this Carole - I could see myself getting totally carried away and making many of these
ReplyDeleteWhat a great idea Carole! Thanks for the inspiration!!
ReplyDelete