http://www.thebugbytes.com/
http://3catsandabug.blogspot.com/
http://www.scrappinmystressaway.blogspot.com/
http://nonnasscraps.blogspot.com/
http://cuteandsome.blogspot.com/
http://www.thepapermidwife.com/
http://goodybagdiva.blogspot.com/
http://www.kamscraftyplace.blogspot.com/
http://debseclecticthoughts.blogspot.com/
http://www.onmycraftroomwall.blogspot.com/ YOU ARE HERE!
http://sassyandscrappykate.blogspot.com/
http://www.amysscrappyspace.blogspot.com/
http://milamemories.blogspot.com/
http://sabrioletdesigns.blogspot.com/
http://www.217creations.com/
Now, on to my project.
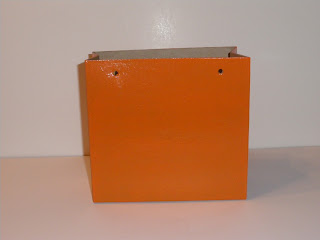
I started with this chipboard gift bag I found last year at Hobby Lobby in the Christmas decor section. I thought it would make a great Trick or Treat bag decorative candy holder.
My first step was to paint it. I purchased two types of orange acrylic paint at Michael's and wasn't sure which to use. I decided I would start with the plain orange paint, top it with a layer of the glitter paint, and see how it looked.
I removed the twine handles to make it easier to paint. I love painting chipboard! (I had to throw that in) I think chipboard takes paint so well, so I was a bit confused by how sheer this paint looked on my project. I realized after the second coat that I had purchased glossy paint (yes, it took me two coats to realize that) and that was why the chipboard was not absorbing the paint in the manner I was accustomed to. After the third coat, I decided a little of the chipboard color showing through didn't look so bad (right?)
Now I was ready to try out the Glamour Dust glitter paint, which I had never used before. I loved it as soon as the first brush stroke went on! Yay! It was pretty and sparkly and I was very happy with the result!
Time to decorate. I decided to use my Mini Monsters cartridge because I knew it would have the right characters for the look I wanted and I'd only used this cartridge for one other project. I needed to get my money's worth for this cartridge purchase!
I chose <Spooky> with Base shadow, Layer 1 and Layer 2, cut at 3"
And <Gross> with Base Shadow, Layer 1 and Layer 2, cut at 3"
For my letters I used the font from Birthday Cake (this is one of my top 5 favorite fonts to use) cut at 1.25". I cut both the Green and Purple letters the same size (no shadow) and layered the top letter slightly askew to create the shadow look. I had these cute little spider stickers a crafting friend gifted me and I thought they added just the right touch. I had intended on tying the twine handles back on but opted to use black and white grossgrain ribbon instead.
Filled with trick or treat candy, I decided this Trick or Treat bag will be the perfect candy holder come Halloween night! Until then, I have to hide the candy from the candy monsters lurking in my house.
Supplies:
Chipboard gift bag
Paint-Pumpkin Orange Glossy (Plaid) and Orange Glamour Dust (DecoArt)
Cardstock-The Ghosts and Goblins Cardstock matstack (DCWV-love this stack!)
Cartridges-Mini Monsters, Birthday Cake (Provocraft)
Ribbon from my stash. I used black diamond Stickles to accent the eyes.
Well, I need to give away some blog candy, don't you think? Yes, I do. Please leave a comment here with a way to contact you should you be chosen as the winner. I will pick the random winning comment Sunday evening (10/23/2011) at 9:00 pm EDT. The prize will be a $10 gift card to either Michael's or JoAnn's. Winner gets to choose which card they'd like.
Thanks for stopping by!
Now onto my talented friend Kate's blog over at Sassy and Scrappy.


I think it turned out adorable!
ReplyDeleteLove these treat bags. Fab idea x
ReplyDeleteCute bag. Love how you altered it by painting and embellishing it. TFS
ReplyDeleteSuch a stinkin' cute project - so you have a candy monster lurking in your house too?
ReplyDeleteYour chipboard altered bag is too cute!!! You did a great job on it!
ReplyDeleteGREAT! It is so cute I wanna take it and go out to fill it up :D
ReplyDeleteGreat idea Carole, I've never seen those chipboard bags before! I love those cute little monsters.
ReplyDeleteWOW!!! This is great!!!
ReplyDeleteDana
Danascraftycorner.blogspot.com
Fabulous idea! Love the bright colors and the cute monster!
ReplyDeleteThat's super cute! Yes, fill it with candy and give it to me! lol! I love mini monsters cart!
ReplyDeleteDanielle
I just love your candy holder bag ! It is so fun ! I have seen those bags but could never think of anything to do with them. Thanks for the inspiration.
ReplyDeleteDebbie
scraphappydeb2010@gmail.com
Great idea! Julia & I might have to break out the Mini Monsters cartridge tomorrow and see what we can make.
ReplyDeleteGreat goodie bag and giveaway. Thanks. My blog is Loving Scrapper 101 and my email is marg0006@verizon.net.
ReplyDeleteSuch a cute Halloween goodie bag! Thanks for the clear instructions!
ReplyDeleteCarolyn
http://cccscraproom.blogspot.com
From Sonya Monts: Carole, I can't post, but I think your project is cute!
ReplyDeleteGreat treat bag!
ReplyDeleteSorry I did not make it sooner (out of town with only my phone and galaxy tablet) but I did see your project on Pam's blog. Had no idea the bag was not orange and was actually chip board ~ totally love how you painted it!!! Such a cute bag and so glad to be in this hop with you!!!
ReplyDeleteGreat job!
ReplyDeleteWell I was supposed to pick at 9 o'clock but i had to watch my new favorite show Boardwalk Empire (it was good!) so I'll be picking the number through random.org now. I'll be posting momentarily!
ReplyDeleteBTW, thanks for all the nice comments everyone! I truly enjoyed my first ever blog hop!
What a cute treat bag! TFS Callyann
ReplyDeletehttp://callyanncraftyycreations.blogspot.com