Happy Monday, my crafties!
I'm still feeling good from the Classy Scrappers crop I attended on Saturday. We had a great time! My daughter, Kristen, ended up coming with me, which I always enjoy. There were also some new friends as well as some people I hadn't gotten to craft with for a while. My friend Sally brought her 13 yr old daughter, Julia, who was such a huge help and quite the crafter.
Maggie taught us all how to enhance a plain t-shirt with fabric flowers. Here's the shirt I made:
The t-shirt was purchased from Wal-Mart. I really like the neckline and it wasn't too pricey (maybe $5).
Here's a close up....the green flower was made from fabric Maggie provided. The other flowers were from an old shirt I was going to throw away.
Plastic beads were added to the large green flower. The green dots around the blue flowers were created with Tulip paint. The flowers and beads were added using Beacon Fabric Tac glue.
Now, here's Kristen's shirt:
I love the way her's turned out! Her flower placement is great.
Everyone's t-shirt was different and turned out great. We cut the flowers using Sizzix flower dies and the Cuttlebug. Cutting fabric is so simple with dies, even the knit shirt material Kristen and I used for our flowers cut easily.
This is a fun craft that you can do with minimal supplies. And recycling old clothes is a great perk of this project. I would love to see any shirts you've made. Leave me a link to your blog if you have any you'd like to share.
See you soon,
Carole
Monday, August 15, 2011
Sunday, August 14, 2011
Chica's Getting Crafty.....Come Visit me!
Happy Sunday everyone! Today, my first project as a Crafty Chica Design Team member is featured over on the Chica's Getting Crafty blog. Please check it out and leave me a little love (comment) over there if you don't mind! The card was inspired by a song my good friend Cathy and I love to dance to whenever we are out partying and given the opportunity to dance. I know a young couple who is in the process of purchasing their first home and this card will be making it's way to them with a housewarming gift in the near future.
Love Shack card
Thanks for checking it out!
Love ya,
Carole
Love Shack card
Thanks for checking it out!
Love ya,
Carole
Wednesday, August 10, 2011
Exciting News!
...for me that is! I have been asked to be a Design Team member over on the Passionately Artistic blog. If you haven't visited the blog in a while, or have never visited the blog, you should check it out. Maggie has a linking party going on over there and there are some amazing projects you will want to take a look at.
The pencil holder I made is actually an altered dog food can (don't worry, I cleaned it out thoroughly). Since we can never find a pencil in our house, I thought this would be a great "back to school" project for our home. I used one of my favorite materials - dictionary papers, and favorite elements - paper flowers, to spruce up this pencil holder and make it more my style. A bit of tulle and some beaded flourishes and this project was complete. But you'll have to go the Passionately Artistic blog to take a peek!
I don't have a Design Team badge yet, but I have a link to the Passionately Artistic on the right side of my blog. Or, you can just follow this link Passionately Artistic.
Happy crafting!
Carole
Monday, August 8, 2011
Mini Album
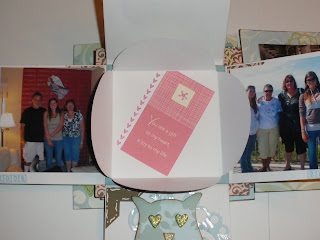
Hello, all. It's been too long since I've posted. I made this mini album a few months ago and have been wanting to post it. It's the first mini album I've made and it was a lot of fun. I'm quite proud of how it turned out.
This album will be going to my goddaughter, Danielle, who is the subject of this album. My beautiful goddaughter is lucky enough to be going to school at University of Hawaii. She posts the most awesome photos on Facebook, and I decided to snatch a few for this little book. I also included a photo of my other beautiful nieces, Jennifer and Rebecca (Danielle's sisters), and MY beautiful sister Theresa, the mother of these wonderful girls. I am truly going to hate giving this little book up, but I will. And I'm glad I'm posting for all to see, and so I can look at it whenever I get the urge.
I made the bones of this book at a class given by my good friend Maggie Lamarre at one of the monthly crops she hosts at a local church (let me know if you are interested in attending). I must give her thanks for the lesson. The book was made with chipboard (I used cereal boxes for most of it) and I loved the creative feedom making my own book gave me. I will be doing more of these.
Finished size of this album is 6" X 6".
Friday, July 22, 2011
Sew Easy (but not so quick) Get Well Card
Hi, all,
I purchased a Sew Easy (We R Memory Keepers) kit on HSN a few months ago and decided I better try it out. The kit came with a mat, 4 stitch design heads, the Sew Easy tool and 4 cards of colored floss. Since the DCWV cardstock I used for this Get Well Soon card has a cross stitch type design, I decided this would be a good card to try out some stitches. For those unfamiliar with the Sew Easy tool, it's a manually manipulated handle with a rolling stitch "head". These heads come in different stitch designs. They twist on and off the handle easily and the tool is well designed for comfort and ease of use. You roll the tool with selected stitch head across your paper and it makes holes for you to stitch. Now, for my results:
I purchased a Sew Easy (We R Memory Keepers) kit on HSN a few months ago and decided I better try it out. The kit came with a mat, 4 stitch design heads, the Sew Easy tool and 4 cards of colored floss. Since the DCWV cardstock I used for this Get Well Soon card has a cross stitch type design, I decided this would be a good card to try out some stitches. For those unfamiliar with the Sew Easy tool, it's a manually manipulated handle with a rolling stitch "head". These heads come in different stitch designs. They twist on and off the handle easily and the tool is well designed for comfort and ease of use. You roll the tool with selected stitch head across your paper and it makes holes for you to stitch. Now, for my results:
I used the running stitch head (green cardstock) first. The result was less than stellar. I think I should have used more strands of floss. Since this was an experiment, I decided to move on to the cross stitch head. The green floss on the yellow cardstock is the result of that trial. It was better, but I was enjoying the act of stitching way more than the result. Also, the stitch heads were not completely piercing my paper, I had to use my paper piercer to finish making the holes. So, I decided for the yellow cross stitched border around the my stamped image, I would use my trusty Stampin' Up paper piercing template, mat and piercer. Loved it! It took me hours to do all this stitching, but I was cropping with friends and found it quite therapeutic.
The stamp I used is from a recently discontinued Stampin Up set (Wellness Wishes). I love this sick dog. He just makes you go awwwww..... It's my favorite part of the card! I colored the image with Stampin Up water color pencils.
I have not given up on my Sew Easy. In fact, I just bought some awesome metallic floss to try out with it. More to come....... I'll include pictures of the Sew Easy kit next time.
Wednesday, July 20, 2011
I'm Going to Be Published!!
Holy Carp!!! A card I submitted to Cricut Magazine is going to be published! I am soooooo thrilled, words cannot express my joy! My submission will be published in the January 2012 Cricut magazine. That is if I get my stuff to them on time (insert nail biting emoticon here). I have to write all the materials and cuts I used and give a brief description of how I put the card together. I am working on that tonight, but I won't get this in the mail until Friday. I want everything to be perfect. Thanks to Maggie, Lisa, Kate and Cathy for the encouragement to create and submit my card. Love you ladies!
Just had to share my joy with my cyber friends!
Just had to share my joy with my cyber friends!
Wednesday, June 29, 2011
A Patriotic Challenge
Hi all! This is officially my first post. My friend Maggie made me this awesome blog and used some previous postings to start it for me. Thank you, Maggie! Welcome. I hope you will become a follower and come visit me often.
My project today is for the Cricut Circle Patriotic Challenge over on the Circle Blog. It seems most of my projects these days are made for, or inspired by, the Circle Blog. I'm not even sure what the prize is this time, but wish me luck!
My project is a wreath. I had a naked grapevine wreath just hanging around the house for several months and a bare door that needed an adornment and decided I'd take this opportunity to do something about both of them. The challenge requirements were simple, at least two Cricut cuts and a patriotic them.
Here's what I did:
The small stars were scattered around the wreath and adhered with hot glue. This was an extremely economical project. Materials were a grapevine wreath, cardstock, a few eyelets and bakers twine.
Maggie would be so proud of me for not being perfect...and yet still liking this project! Thanks to Daphne and Angie for giving me the patriotic paper I used, and to Maggie for teaching me how to make these stars 3D. I also used red, white and blue cardstock from Stampin' Up and Bazzill.
Please become a follower and leave a comment. I'd love to hear from you!
Carole
My project today is for the Cricut Circle Patriotic Challenge over on the Circle Blog. It seems most of my projects these days are made for, or inspired by, the Circle Blog. I'm not even sure what the prize is this time, but wish me luck!
My project is a wreath. I had a naked grapevine wreath just hanging around the house for several months and a bare door that needed an adornment and decided I'd take this opportunity to do something about both of them. The challenge requirements were simple, at least two Cricut cuts and a patriotic them.
Here's what I did:
- The stars were cut from the George and Basic Shapes cartridge-cut at 3.5 inches (5) and 1.5 inches(10). I scored each heart from point straight across using my Scor-pal. I folded each point along the score line and then pinched each leg of the star . This created the 3D effect. I cut 5 Circles at 2.75 inches and hot glued a large star to each.
- Glue each star/circle to a pleated circle (not sure what these are officially called). They were made by cutting 2 12"X2" paper strips. Each strip was scored at 1/2 inch intervals and then accordion folded. The accordions were attach end to end and then joined to made an accordion circle. I had to hold the accordion in place while hot gluing the circle/star to it and it was a bit tricky.
- You can see at least one of my accordions turned out rather wonky (if you look closely). The USA sign was made using a simple frame and shadow from Lacy Labels (cut at 3.5 inches). The USA font was from the Birthday Cakes cartridge (cut at 2 inches), also with shadow. I'm really liking this cartridge. Thank you Kris S. (my Circle pal) for gifting me this awesome cartridge.
- I added some eyelets and bakers twine and there you have it. I really did not have high expectations for this project but really like the way it turned out. And it was very quick and simple to put together.
The small stars were scattered around the wreath and adhered with hot glue. This was an extremely economical project. Materials were a grapevine wreath, cardstock, a few eyelets and bakers twine.
Maggie would be so proud of me for not being perfect...and yet still liking this project! Thanks to Daphne and Angie for giving me the patriotic paper I used, and to Maggie for teaching me how to make these stars 3D. I also used red, white and blue cardstock from Stampin' Up and Bazzill.
Please become a follower and leave a comment. I'd love to hear from you!
Carole
Subscribe to:
Posts (Atom)


